
If you’ve ever found yourself repeating the same cloud tasks day after day, uploading files, syncing folders, moving data between storage services, you already know how time-consuming manual work can get. Air Explorer’s command line feature is built exactly for moments like these: to take the repetitive work off your hands and let automation do the heavy lifting.
Whether you’re a developer, IT professional, or a power user managing large volumes of cloud data, the command line for automations is one of the most powerful tools in your arsenal. Let’s break down what it is, why it matters, and how you can start putting it to work right away.
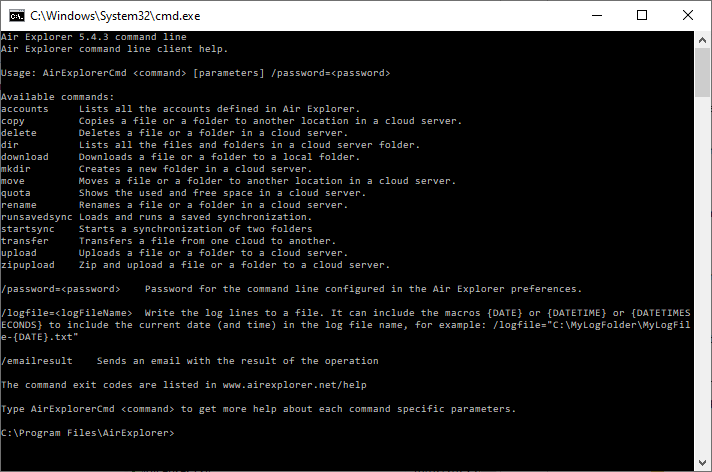
What Is Air Explorer’s Command Line?
The command line interface (CLI) in Air Explorer allows you to control the application and trigger specific actions directly from your system’s terminal or command prompt, no graphical interface required. Instead of clicking through menus, you write simple text-based instructions that tell Air Explorer exactly what to do.

This opens the door to a completely different way of working with cloud storage. You can script tasks, chain multiple operations together, and schedule them to run automatically, all from within Air Explorer itself, without relying on any external tools.
Why Use the Command Line for Cloud Automations?
The short answer: speed, consistency, and control.
- Save time by automating repetitive tasks you’d otherwise do manually every day
- Eliminate human error since scripted commands always run the same way, every time
- Scale effortlessly by running the same workflow across hundreds of files or folders without extra effort
- Integrate with other tools by combining Air Explorer commands with your existing scripts or pipelines
For businesses handling regular data backups, content distribution, or multi-cloud synchronization, this is a genuine game-changer.
What Can You Automate?
Air Explorer’s command line covers a wide range of cloud operations. Here are some of the most popular use cases:
- Automated uploads: Push local files or entire folder structures to any connected cloud service on a schedule, without lifting a finger
- Automated downloads: Pull files from the cloud to your local machine automatically, keeping local copies always up to date
- Cloud-to-cloud syncs: Synchronize folders between two different cloud services, such as Google Drive and OneDrive, Amazon S3 and Dropbox, or any combination you work with
- Batch file operations: Move, copy, or organize large numbers of files across cloud accounts without manual intervention
The possibilities multiply when you start combining these actions into multi-step scripts tailored to your specific needs.
How Does It Work?
Using Air Explorer’s command line is simpler than it might sound. Air Explorer provides a set of documented commands and parameters that you include in your scripts. A basic automation looks something like this: you define the action (upload, download, sync), specify the source and destination paths, which can be local folders or cloud locations, and add any optional parameters to fine-tune the behavior, such as filtering by file type, enabling overwrite rules, or setting sync direction.
Once your command is ready, you can run it manually from the terminal whenever you need, no third-party tools needed. Air Explorer handles the connection to your cloud accounts and executes the task exactly as instructed.
Getting Started
To begin automating with Air Explorer’s command line, you’ll need the application installed and your cloud accounts connected. From there, the documentation walks you through the available commands, parameters, and example scripts to get you up and running quickly.
Cloud automation isn’t just for enterprise teams with dedicated IT departments anymore. With Air Explorer and a few well-crafted commands, anyone can build workflows that save hours every week and keep their data moving exactly where it needs to go.
Ready to stop doing things manually? Explore Air Explorer’s command line documentation and start building your first automation today.